
Every recognised school in India reports its students on the UDISE+ student module, and every year the same office staff face the same questions. Do we re-enter every child? Why won't this transfer student import? Why can't we fix a date of birth? Who certifies the data, and what happens if we certify too early?
This guide answers those questions in the order the work actually happens: moving last year's students forward, adding new admissions, completing each profile, fixing Aadhaar mismatches, handling leavers and certifying. It is written for the person who sits at the school's UDISE+ login - usually the office in-charge, data-entry staff or the head of school.
Note: UDISE+ screens and timelines are set by the Ministry of Education and your state. Everything here comes from the official UDISE+ portal, the SDMS user manual for schools and the Ministry's letters to states. Screens can change between cycles, so check the latest manual on the portal before you start.
What the UDISE+ Student Module Is
UDISE+ (Unified District Information System for Education Plus) is the Ministry of Education's national school database. Schools enter data online, and it is then verified at block, district and state level.
It has three connected parts:
| Module | What it holds |
|---|---|
| School Profile & Facilities | Infrastructure, facilities and basic school details |
| Teacher | Each teacher's profile and a National Teacher Code |
| Student (SDMS) | Each student's record in the Student Database Management System |
Since 2022-23, UDISE+ has worked as a student registry. Each child has a record with more than 60 fields and an 11-digit Permanent Education Number (PEN) that stays with them when they move school. The same record now feeds APAAR ID generation, board exam lists of candidates and several government schemes - which is why errors in it travel a long way.
The 2026-27 Cycle at a Glance
For 2026-27, the Ministry's letter to states asks for data entry to be completed by 30 September 2026. It repeats an important point: existing students in Classes I to XII only need to be progressed, not entered again. Fresh entry is only for new admissions.
States can set earlier internal deadlines - Delhi, for example, asked its schools to finish 2025-26 progression by the end of July 2026. If your block MIS has given you a different date, follow it, and check the portal's home page for any extension letter.
Before You Log In
- Credentials. A school gets its login from the next level up, the Block MIS. If the registered mobile number is lost, the block resets it. The login page is sdms.udiseplus.gov.in.
- Who is responsible. The head of school - principal, headmaster or senior-most teacher - is responsible for the school's data and its certification.
- Your own records. Keep a current list of students with admission numbers, dates of admission, correct spellings, dates of birth, parents' names, category, previous year's result and attendance days. Most UDISE+ errors start as an untidy register.
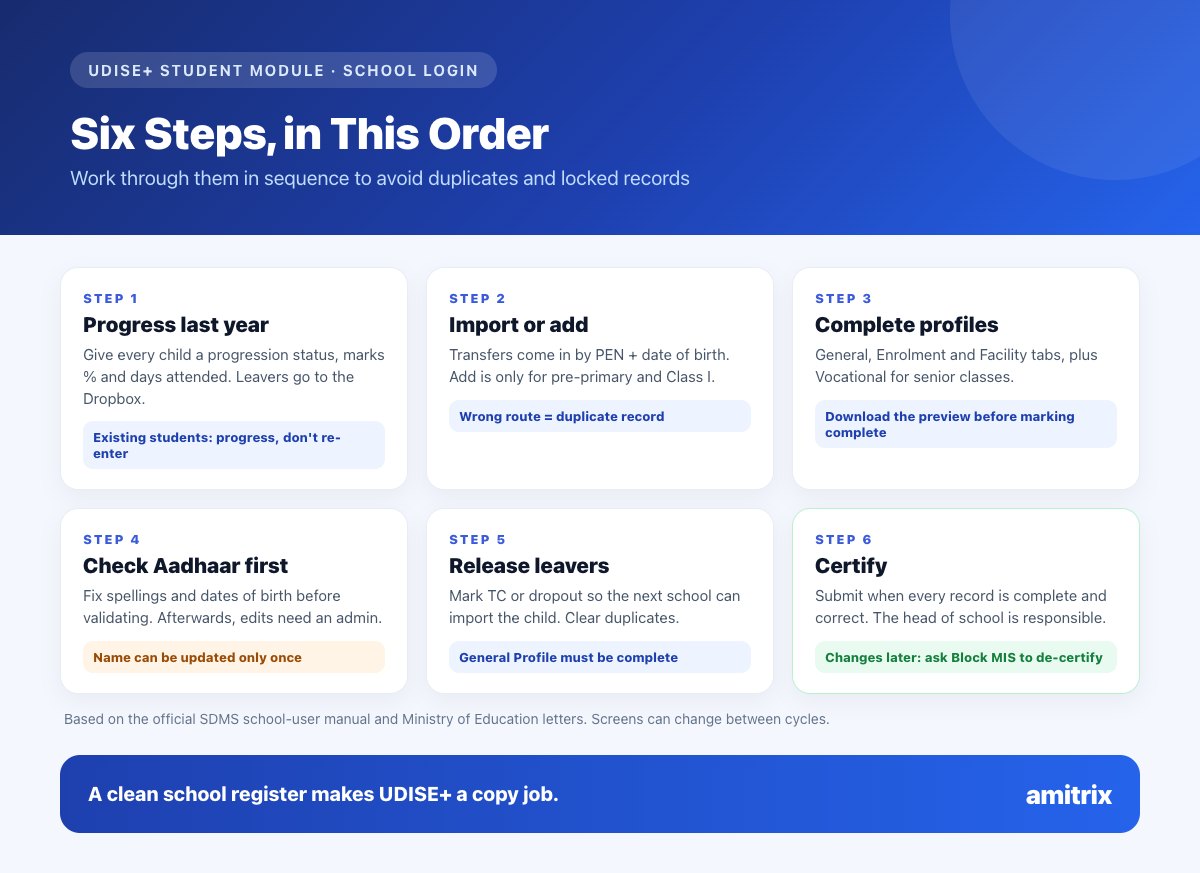
How to Fill the UDISE+ Student Module: 6 Steps
Work through these in order. Each step depends on the one before it.
Step 1: Progress Last Year's Students
Progression is the year-end task that moves each student from 2025-26 into 2026-27. Open each class and section, and give every child a progression status:
- Promoted/Passed with Examination
- Not Promoted/Not Passed/Repeater
- Promoted/Passed without Examination
- Discontinued before Examination
- Promoted/Passed Provisionally (Classes X and XII only)
Enter the marks percentage and days attended, then the schooling status: either "Studying in the same school" or "Left school with TC / without TC". Children marked as having left go to the Dropbox, where their next school can pick them up.
Finalise section by section, then finalise the school. If you spot a mistake afterwards, the Correction option lets you reopen it.
Why this step matters most: a school that delays progression blocks other schools. A child who has moved cannot be imported by the new school until the old school completes progression and releases them.
Step 2: Add New Admissions - Add or Import?
There are two routes, and choosing the wrong one creates duplicates.
Import - for any child who was already in UDISE+ at another school. Search by PEN and date of birth. If you don't have the PEN, use "Get PEN & DOB" with the child's Aadhaar number and year of birth. Choose the class, section and date of admission, then import. Imports work both within your state and from outside it.
If the previous school hasn't released the child, raise a Student Release Request using the PEN and date of birth. The old school approves or rejects it, and within the state a rejected request can be escalated once.
Add - only for children who have never had a UDISE+ record, which in practice means pre-primary to Class I. School users cannot add students in higher classes; those rare cases, such as a child coming from an unrecognised school, go through the district MIS after document checks.
The Add screen asks for: whether Aadhaar is available, the name as in school records, gender, date of birth, mother's, father's and guardian's names, Aadhaar number and name as per Aadhaar, and the admission date.
See how a clean student register - with admission numbers, parents' names and dates of birth in one place - makes UDISE+ entry a copy job instead of a hunt.
Book a free demo →Step 3: Complete the Three Profiles
Every student record has three main tabs, plus a fourth for vocational subjects in secondary and higher secondary classes. Work through them in order and download the profile preview before you mark the record complete.
| Tab | Typical fields |
|---|---|
| General Profile (GP) | Gender, date of birth, parents' and guardian's names, Aadhaar and name as per Aadhaar, address, PIN, mobile and email, mother tongue, social category, minority group, BPL and AAY status, EWS/disadvantaged group, CWSN details, nationality, out-of-school history, blood group |
| Enrolment Profile (EP) | Admission number and date, roll number, medium of instruction, languages, stream and subjects (higher secondary), status and class in the previous year, previous result, marks percentage, days attended, and - for private unaided schools - the category the child was admitted under |
| Facility Profile (FP) | Facilities received, CWSN facilities, screening for learning disabilities, gifted or talented status, competitions and Olympiads, NCC/NSS/Scouts, digital device access, height, weight, distance from home, parents' highest education |
| Vocational Education | For secondary and higher secondary students taking vocational subjects |
A practical tip: the Enrolment Profile asks for last year's marks percentage and days attended for every child. If your attendance and exam records live in different registers, gather those two numbers class by class before you start.
Step 4: Aadhaar Checks and Corrections
This is where most schools get stuck. The rules are strict on purpose:
- The student's name can be updated only once, through the name-update option, and major changes are not allowed.
- Before Aadhaar is verified, the school can edit gender, date of birth and parents' names in the General Profile.
- After Aadhaar is verified, those fields are locked for the school - ask your block, district or state admin.
- After an APAAR ID is generated, the school cannot change the Aadhaar number.
- Any change to name, date of birth, gender, Aadhaar number or name as per Aadhaar needs the Aadhaar to be re-validated with UIDAI from the active students list.
The lesson: get spellings and dates of birth right before you validate Aadhaar. Check the school record, the birth certificate and the Aadhaar card side by side, and resolve differences with the family first.
Step 5: Transfer Certificates and Dropouts
When a child leaves mid-year, use the Transfer Certificate / Mark Dropout option. The child moves to the Dropbox so their next school can import them. The General Profile must be complete before you can do this, and a dropout needs a reason (such as economic reasons, long absence or transport difficulty).
The Ministry has pointed out that under-use of the Dropbox causes duplicate records across schools. If a child has left, release them - don't leave them sitting in your active list.
There is also a Duplicate Records view for the current year. Check it before you certify.
Step 6: Certify Your Data
When every student is progressed, every new admission is added or imported and every profile is complete, the school submits and a certificate is generated. Data can only be submitted after certifying that it is complete and correct, and the person who certifies is responsible for it.
Need to change something after certifying? Ask the Block MIS to de-certify your school. The same rule runs upwards: blocks ask districts, and districts ask the state.
Common UDISE+ Errors and Fixes
| Problem | Likely cause | What to do |
|---|---|---|
| Transfer student won't import | Old school hasn't progressed or released the child | Ask the old school, or raise a Student Release Request |
| Wrong class offered at import | Previous class recorded wrongly | Contact your Block MIS |
| Can't edit date of birth or parents' names | Aadhaar already verified | Ask the block, district or state admin |
| Can't add a Class 5 student | Add is limited to pre-primary and Class I | Import by PEN, or route through the district MIS |
| Can't mark TC or dropout | General Profile incomplete | Complete the profile first |
| Duplicate records | Child re-entered instead of imported | Use the Duplicate Records view and import from the Dropbox |
| APAAR shows a demographic mismatch | Name or DOB differs from Aadhaar | Correct the record (see Step 4), then retry |
For technical problems, the official first contact is your Block or District MIS; the UDISE+ portal lists their contacts along with the national help desk.
UDISE+ and APAAR
A student's APAAR ID - the "One Nation, One Student ID" - is generated from inside UDISE+, and the student must already have a PEN. The name in UDISE+ must match Aadhaar, and parents must give consent for minors. That makes a clean UDISE+ record the first step of APAAR. Our guide to APAAR ID for school students covers the consent form and bulk generation.
How School Software Helps
UDISE+ is filled on the government portal, and no private software replaces that. What good school software does is keep the facts UDISE+ asks for in one accurate place:
- admission numbers and dates issued and stored automatically
- names, dates of birth and parents' names checked once at admission
- category, EWS/RTE status and CWSN details on the student record
- attendance days and exam percentages calculated for every child
- class lists exportable to Excel in one click, ready to copy from
Amitrix EMS keeps all of this in one student record, from admission to transfer certificate, for one flat ₹12,000 a year. Schools in Delhi can see how it fits the rest of the year on our School ERP in Delhi page, and student data is protected in line with the DPDP Act for schools.
We will show you a UDISE+-ready class list from your own data.
Book a free Amitrix demo →Frequently Asked Questions
How do I log in to the UDISE+ student module?
Go to sdms.udiseplus.gov.in and sign in with the school credentials issued by your Block MIS. If you have lost the registered mobile number, the Block MIS can reset access.
Do we need to enter all students again every year?
No. Students already in UDISE+ only need to be progressed to the new year. Fresh entry is only for new admissions; children moving from another school should be imported by PEN, not added.
What is a PEN in UDISE+?
The Permanent Education Number is an 11-digit number generated by the system for each student. It stays with the child across schools and is used to import them when they transfer.
Why can't I change a student's date of birth in UDISE+?
If the student's Aadhaar has already been verified, the school can no longer edit date of birth, gender or parents' names. Ask your block, district or state admin, and re-validate Aadhaar after the change.
What is the last date for UDISE+ 2026-27 data entry?
The Ministry's letter for 2026-27 asks for data entry to be completed by 30 September 2026. States and blocks may set their own dates or announce extensions, so check with your Block MIS and the portal.
How do I fix an APAAR demographic mismatch?
Make sure the student's name, date of birth and gender in UDISE+ match Aadhaar exactly. Correct the record (with admin help if Aadhaar is already verified), re-validate Aadhaar and then generate the APAAR ID again.
Conclusion
The UDISE+ student module rewards schools that work in order: progress last year's children, import rather than re-add transfers, add only true new entrants, complete all three profiles, sort out Aadhaar spellings before validating, release leavers to the Dropbox, and certify only when the duplicate list is empty.
Do that, and the 2026-27 cycle becomes a few focused days of work instead of a month of corrections - and your APAAR IDs and board lists will follow without surprises.
Want a student register that makes UDISE+ easy? Book your free demo today.